Enbrel
What is Enbrel (Etanercept)?
Top Global Experts


Related Clinical Trials
Summary: In rheumatoid arthritis (RA), the consensual 1st line conventional synthetic disease modifying antirheumatic drugs (csDMARD) of RA is methotrexate (MTX). In case of contra-indication or intolerance to MTX, leflunomide is an alternative. If the treatment target is not achieved with csDMARD strategy, addition of a biological DMARD (TNF inhibitors, anti-Interleukin 6 (anti-IL6)), abatacept, or rituxi...
Summary: This is a prospective, multicenter, randomized controlled trial designed to evaluate whether the combination of ruxolitinib and etanercept provides superior efficacy compared with ruxolitinib monotherapy in patients with severe corticosteroid-refractory acute graft-versus-host disease (SR-aGVHD) after allogeneic hematopoietic stem cell transplantation (allo-HSCT). Acute graft-versus-host disease (...
Summary: This research study combines two different ways of fighting cancer: antibodies and Natural Killer T cells (NKT). Antibodies are types of proteins that protect the body from infectious diseases and possibly cancer. T cells, also called T lymphocytes, are special white blood cells that can kill other cells, including cells infected with viruses and tumor cells. Both antibodies and T cells have been ...
Related Latest Advances
Brand Information
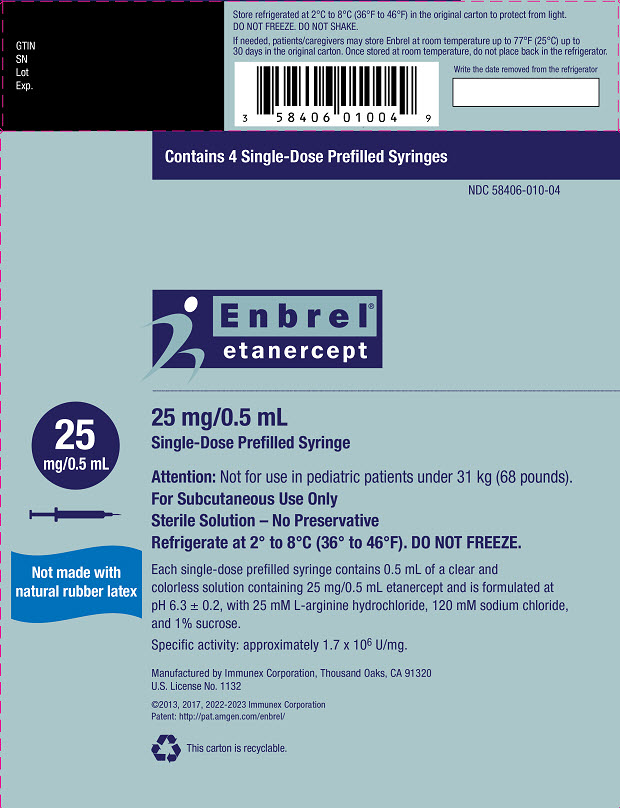
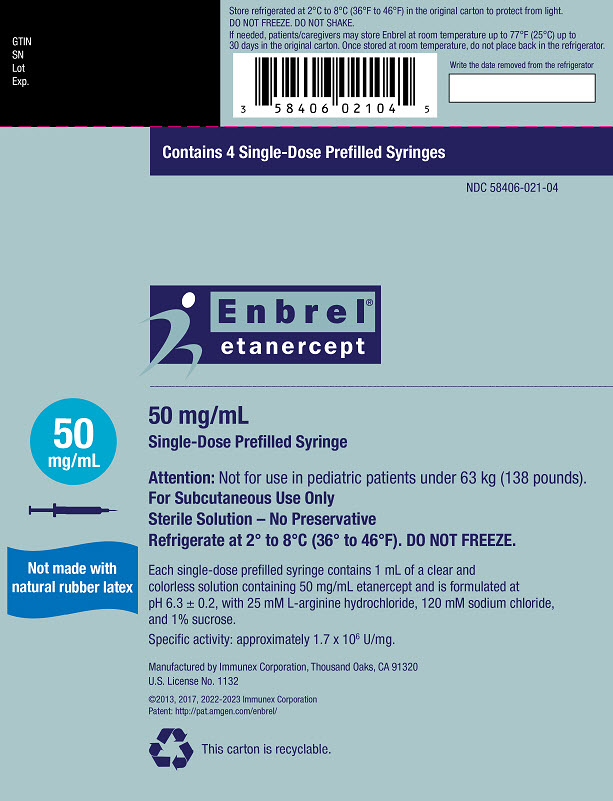
- Injection: 25 mg/0.5 mL and 50 mg/mL clear, colorless solution in a single-dose prefilled syringe
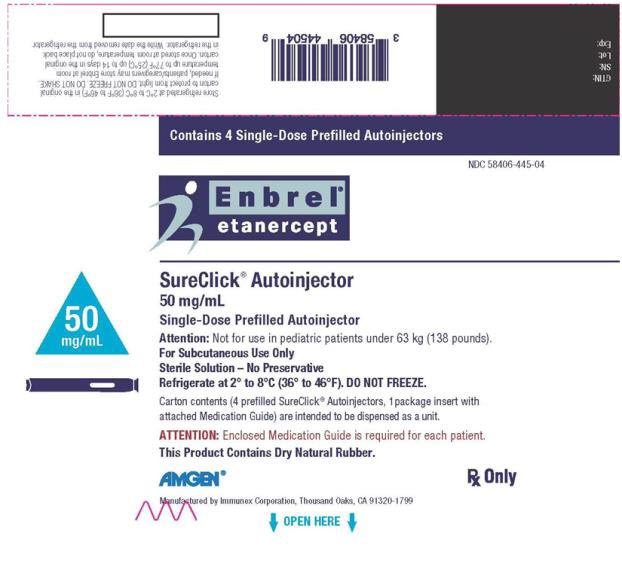
- Injection: 50 mg/mL clear, colorless solution in a single-dose prefilled SureClick autoinjector
- Injection: 25 mg/0.5 mL clear, colorless solution in a single-dose vial
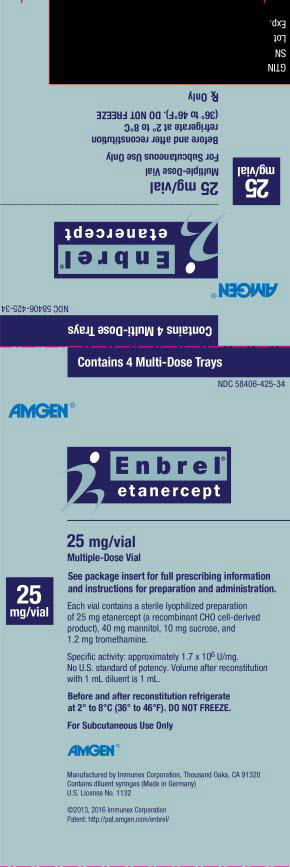
- For Injection: 25 mg lyophilized powder in a multiple-dose vial for reconstitution
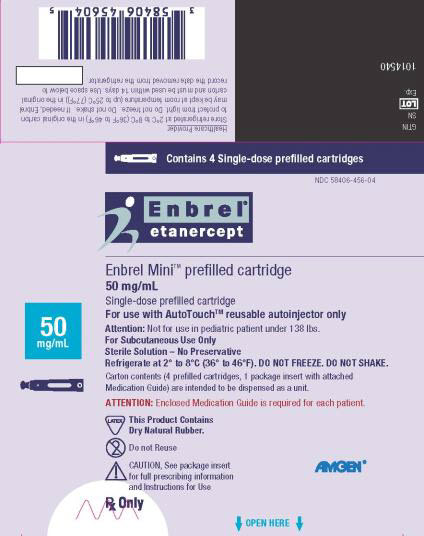
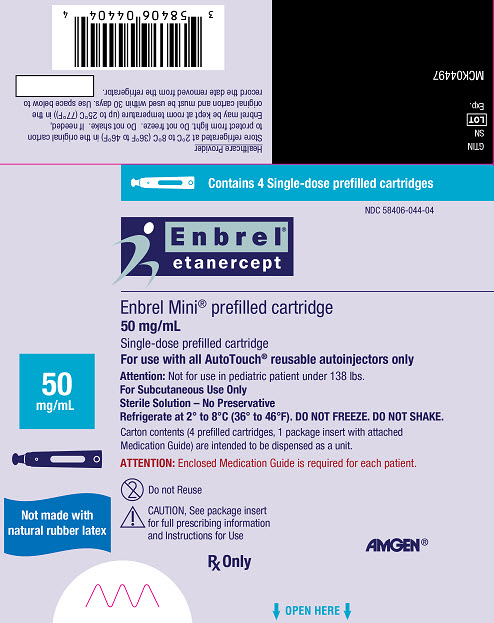
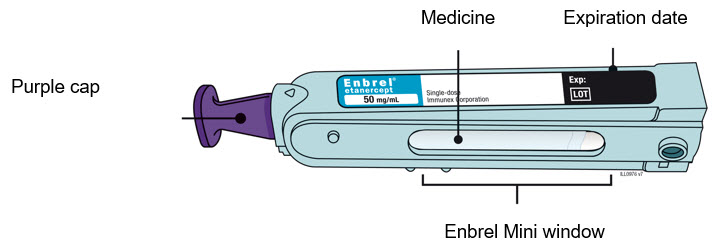
- Injection: 50 mg/mL clear, colorless solution in Enbrel Mini single-dose prefilled cartridge for use with the AutoTouch reusable autoinjector only
- Serious Infections
- Neurologic Reactions
- Malignancies
- Patients with Heart Failure
- Hematologic Reactions
- Hepatitis B Reactivation
- Allergic Reactions
- Autoimmunity
- Immunosuppression
- National Cancer Institute. Surveillance, Epidemiology, and End Results Database (SEER) Program. SEER Incidence Crude Rates, 13 Registries, 1992-2002.
- Bröms G, Granath F, Ekbom A, et al. Low Risk of Birth Defects for Infants Whose Mothers Are Treated With Anti-Tumor Necrosis Factor Agents During Pregnancy.
- It is important that you do not try to give the injection until you have fully read and understood this Instructions for Use.
- Check the autoinjector label and prescription to make sure you have the correct medicine and dose.
- Do not use the autoinjector if the carton is damaged or the seal is broken.
- Do not use the autoinjector after the expiration date on the label.
- Do not shake the autoinjector.
- Do not remove the white cap from the autoinjector until you are ready to inject.
- Do not use the autoinjector if it has been frozen.
- Do not use the autoinjector if it has been dropped on a hard surface. Part of the autoinjector may be broken even if you cannot see the break. Use a new autoinjector, and call 1-888-4ENBREL (1-888-436-2735).
- Children must weigh at least 138 pounds to use the ENBREL SureClick autoinjector. Children who weigh less than 138 pounds should use a different form of ENBREL.
- The autoinjector is not made with natural rubber latex.
For additional information and answers to frequently asked questions, visit www.enbrel.com.
If you want more information or help using ENBREL:
- Contact your healthcare provider,
- Visit
- Call 1-888-4ENBREL (1-888-436-2735).
- Refrigerate the autoinjector carton until you are ready to use it.
- Keep the autoinjector in the refrigerator between 36°F to 46°F (2°C to 8°C).
- Keep the autoinjector in the original carton to protect it from light or physical damage.
- Do not freeze the autoinjector.
- Do not store the autoinjector in extreme heat or cold. For example, avoid storing in your vehicle's glove box or trunk.
- Wait 30 minutes for the autoinjector to reach room temperature.
- Remove the autoinjector and put any unused autoinjectors back into the refrigerator.
- Let the autoinjector warm up naturally.
- Do not heat the autoinjector with hot water, a microwave, or direct sunlight.
- Do not shake the autoinjector at any time.
- Using the autoinjector at room temperature makes sure the full dose is delivered and allows for a more comfortable injection.
- You may keep ENBREL at room temperature for up to 30 days, if needed.
- For example, when you are traveling, you may keep ENBREL at room temperature.
- Keep it at room temperature between 68°F to 77°F (20°C to 25°C).
- Do not put it back in the refrigerator.
- Record the date you removed it from the refrigerator and use it within
- Inspect the medicine. It should be clear and colorless to slightly yellow.
- It is okay to see air bubbles or small white particles in the medicine.
- Do not use the autoinjector if the medicine is cloudy, discolored, or contains large lumps, flakes or colored particles.
- Check the expiration date (Exp.) and inspect the autoinjector for damage.
- Do not use the autoinjector if the expiration date has passed.
- Do not use the autoinjector if:
- the white cap is missing or loose in carton,
- it has cracks or broken parts, or
- it has been dropped on a hard surface.
- Gather and place the following items for your injection on a clean, flat, and well-lit surface:
- ENBREL autoinjector (room temperature),
- Sharps disposal container [see
- Alcohol wipe,
- Adhesive bandage, and
- Cotton balls or gauze pads.
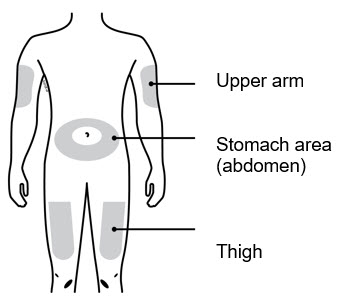
- Select 1 of these injection sites.
- Select the thigh or stomach (except for 2 inches around the belly button).
- Someone else can inject in your thigh, stomach, or back of the upper arm.
- Change injection site each time, shifting the area of the injection to avoid skin irritation.
- Wash your hands thoroughly with soap and water.
- Clean the injection site with an alcohol wipe.
- Let the skin dry on its own.
- Do not touch this area again before injecting.
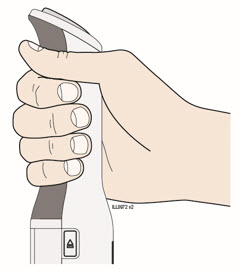
- Grasp the autoinjector so you can see the window. Pull the white cap straight off. You may need to pull hard.
- Do not twist, bend, or wiggle the white cap to pull it off.
- Never put the white cap back on. It may damage the needle.
- Do not put your finger inside the dark green safety guard.
- It is normal to see a drop of medicine come out of the needle or dark green safety guard.
- Stretch or pinch the skin to create a firm surface at the injection site until the injection is finished. Place the dark green safety guard straight against the skin.
- Make sure you can see the window.
- Make sure the autoinjector is positioned straight on the injection site (at a 90-degree angle).
- Firmly push the autoinjector down until the dark green safety guard stops moving. Hold the autoinjector down, do not lift.
- The dark green safety guard pushes in and unlocks the purple start button.
- Keep pushing the autoinjector down and press the purple start button to start the injection.
- You may hear or feel a click.
- The window starts to turn yellow.
- It is okay to let go of the purple start button.
- Keep pushing the autoinjector down. Wait for the window to turn fully yellow.
- The injection may take up to
- You may hear or feel a click.
- After the window turns fully yellow, lift the autoinjector away from the skin.
- The dark green safety guard locks around the needle.
- Confirm a full dose of medicine was injected.
- Do not touch the dark green safety guard.
- A small drop of liquid on the injection site is okay.
- Check the injection site.
- Do not rub the injection site.
- If there is blood, press a cotton ball or gauze pad on your injection site.
- Apply an adhesive bandage if necessary.
- Place the used autoinjector and white cap in an FDA-cleared sharps disposal.
Important: Do not throw away the autoinjector in your household trash. - Do not reuse the autoinjector.
- Do not touch the dark green safety guard.
- made of a heavy-duty plastic,
- can be closed with a tight-fitting, puncture-resistant lid, without sharps being able to come out,
- upright and stable during use,
- leak-resistant, and
- properly labeled to warn of hazardous waste inside the container.
Immunex Corporation
Thousand Oaks, CA 91320-1799
U.S. License Number 1132
©1998–2016, 2019-2025 Immunex Corporation. All rights reserved.
1XXXXXX
- The 50 mg/mL single-dose prefilled syringe that contains one 50 mg dose of Enbrel.
- The 25 mg/0.5 mL single-dose prefilled syringe that contains one 25 mg dose of Enbrel.
- Store the Enbrel prefilled syringe in the refrigerator at 36°F to 46°F (2°C to 8°C).
- Store the Enbrel prefilled syringe in the original carton to protect from light or physical damage.
- If needed, you may store your Enbrel prefilled syringe at room temperature between 68°F to 77°F (20°C to 25°C) for up to 30 days.
- Throw away any Enbrel prefilled syringe that has been stored at room temperature after 30 days.
- Do not store the Enbrel prefilled syringe in extreme heat or cold. For example, avoid storing Enbrel prefilled syringe in your vehicle's glove box or trunk.
- Do not freeze.
- Do not shake.
- Keep the Enbrel prefilled syringe and all medicines out of the reach of children.
- Select a clean, well-lit, flat work surface, such as a table.
- Take the Enbrel carton containing the prefilled syringes out of the refrigerator and place it on your flat work surface. Remove one prefilled syringe and place it on your work surface. Carefully lift the prefilled syringe straight up out of the box.
- Check the expiration date on the prefilled syringe. If the expiration date has passed,
- Do not use the prefilled syringe if the needle cover is missing or not securely attached. Call 1-888-4ENBREL (1-888-436-2735).
- For a more comfortable injection, leave the prefilled syringe at room temperature for about 15 to 30 minutes before injecting.
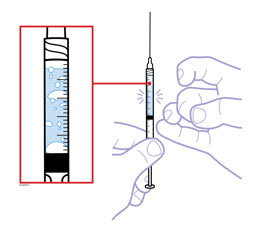
- Hold the prefilled syringe with the covered needle pointing down. If bubbles are seen in the syringe, very gently tap the prefilled syringe to allow any bubbles to rise to the top of the syringe. Turn the syringe so that the purple horizontal lines on the barrel are directly facing you. Check to see if the amount of liquid in the syringe falls between the purple lines. The top of the liquid may be curved. If the syringe does not have the right amount of liquid,
- Assemble the additional supplies you will need for your injection. These include an alcohol swab, a cotton ball or gauze, and a sharps disposal container (see
- Wash your hands with soap and warm water.
- Make sure the solution in the prefilled syringe is clear and colorless. You may notice small white particles in the solution. These particles are formed from Enbrel and this is acceptable. However,
- Recommended injection sites for Enbrel using a prefilled syringe include:
- Rotate the site for each injection.
- If you have psoriasis, you should not inject directly into any raised, thick, red, or scaly skin patches or lesions.
- To prepare the area of skin where Enbrel is to be injected, wipe the injection site with an alcohol swab.
- Pick up the prefilled syringe from your flat work surface. Hold the barrel of the prefilled syringe with one hand and pull the needle cover straight off, only when you are ready to inject.
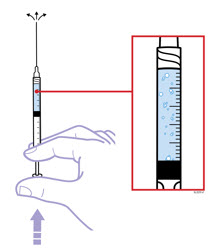
- Holding the syringe with the needle pointing up, check the syringe for air bubbles. If there are bubbles,
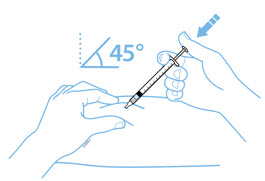
- Holding the syringe in one hand like a pencil, use the other hand to gently pinch a fold of skin at the cleaned injection site and hold it firmly.
- With a quick and "dart-like" motion, insert the needle at a 45-degree angle into the skin.
- When the needle is completely inserted into the skin, let go of the skin that you are holding. With your free hand, hold the syringe near its base to stabilize it. Then push the plunger to inject all of the Enbrel solution at a slow, steady rate.
- When the syringe is empty, pull the needle out of the skin, being careful to keep it at the same angle as inserted. There may be a little bleeding at the injection site. You can press a cotton ball or gauze over the injection site for 10 seconds.
- Put the used prefilled syringes in a FDA-cleared sharps disposal container right away after use.
- If you do not have a FDA-cleared sharps disposal container, you may use a household container that is:
- When your sharps disposal container is almost full, you will need to follow your community guidelines for the right way to dispose of your sharps disposal container. There may be state or local laws about how you should throw away used syringes and needles. For more information about safe sharps disposal, and for specific information about sharps disposal in the state that you live in, go to the FDA's website at: http://www.fda.gov/safesharpsdisposal
- Do not reuse the syringe.
- Do not recycle the syringe or sharps disposal container or throw them into household trash.
Immunex Corporation
Thousand Oaks, CA 91320-1799
U.S. License Number 1132
© 1998 – 2016, 2019-2020, 2022-2024 Immunex Corporation. All rights reserved.
 This printed material is recyclable.
- Store Enbrel multiple-dose vial in the refrigerator at 36°F to 46°F (2°C to 8°C).
- Store Enbrel multiple-dose vial in the original carton to protect from light or physical damage.
- If needed, you may store your Enbrel multiple-dose vial and diluent syringe (dose tray) at room temperature between 68°F to 77°F (20°C to 25°C) for up to 14 days.
- Throw away Enbrel multiple-dose vial that has been stored at room temperature after 14 days.
- Mixed (reconstituted) Enbrel multiple-dose vial should be used right away or kept in the refrigerator at 36°F to 46°F (2°C to 8°C) for up to 14 days.
- Do not store Enbrel multiple-dose vial in extreme heat or cold. For example, avoid storing Enbrel multiple-dose vial in your vehicle’s glove box or trunk.
- Do notfreeze.
- Do not shake.
- Keep Enbrelmultiple-dose vial and all medicines out of the reach of children.
- Select a clean, well-lit, flat work surface, such as a table.
- Take the Enbrel dose tray out of the refrigerator and place it on your flat work surface.
- Check the expiration date on the dose tray. If the expiration date has passed,
- For a more comfortable injection, leave the dose tray at room temperature for about 15 to 30 minutes before injecting.
- Wash your hands with soap and warm water.
- Peel the paper seal off the dose tray and remove all items.
- Inspect the volume of diluent in the syringe with the twist-off cap pointing down. Use the unit markings on the side of the syringe to make sure there is at least 1 mL of liquid in the syringe. If the level of liquid is below the 1 mL mark,
- Do not use the syringe if the twist-off cap is missing or not securely attached. Call 1-888-4ENBREL (1-888-436-2735).
- Two alcohol swabs should be available for the preparation and injection of Enbrel. Alcohol swabs can be found at your local drug store.
- The Vial Adapter Method
- The Free-Hand Method
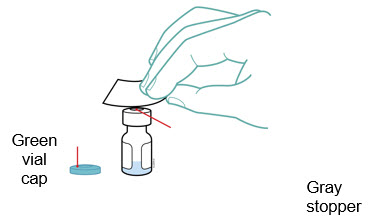
- Remove the pink plastic cap from the Enbrel vial.
- Place the Enbrel vial on your flat work surface or turn your dose tray upside down and place your Enbrel vial in the round space marked “V”. Use one alcohol swab to clean the gray stopper on the Enbrel vial.
- Open the wrapper that contains the 27-gauge needle by peeling apart the tabs and set the needle aside for later use.
- Open the wrapper that contains the vial adapter by peeling apart the tabs and set the vial adapter aside for later use.
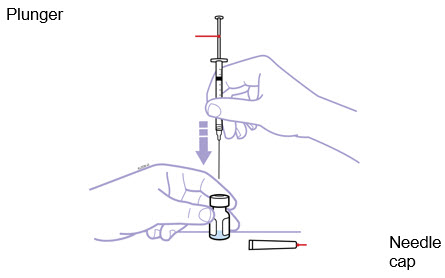
- Slide the plunger into the flange end of the syringe.
- Attach the plunger to the gray rubber stopper in the syringe by turning the plunger clockwise until you feel a slight resistance.
- Remove the twist-off cap from the prefilled diluent syringe by turning counter-clockwise.
- Once the twist-off cap is removed, pick up the vial adapter with your free-hand. Twist the vial adapter onto the syringe, turning clockwise until you feel a slight resistance.
- Hold the Enbrel vial upright on your flat work surface. Grasp the sides of the vial adapter and place it over the top of the Enbrel vial.
- Hold the Enbrel vial upright on your flat work surface and push the plunger down until all the liquid from the syringe is in the Enbrel vial. You may see foaming (bubbles) in the vial. This is normal.
- Gently swirl the Enbrel vial in a circular motion to dissolve the powder. If you used the dose tray to hold your Enbrel vial, take the vial (with the vial adapter and syringe still attached) out of the dose tray, and gently swirl the vial in a circular motion to dissolve the powder.
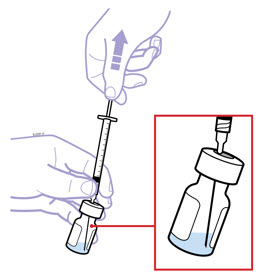
- Turn the Enbrel vial upside down. Hold the syringe at eye level and slowly pull the plunger down to the unit markings on the side of the syringe that correspond with your/your child’s dose. For adult patients, remove the entire volume (1 mL), unless otherwise instructed by your healthcare provider. Be careful not to pull the plunger completely out of the syringe. Some white foam may remain in the Enbrel vial. This is normal.
- Check for air bubbles in the syringe. Gently tap the syringe to make any air bubbles rise to the top of the syringe. Slowly push the plunger up to remove the air bubbles. If you push solution back into the vial, slowly pull back on the plunger to again draw the correct amount of solution back into the syringe.
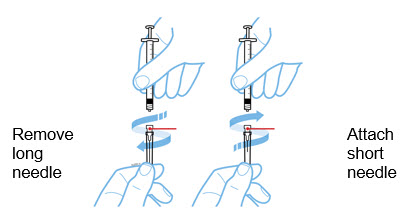
- Remove the syringe from the vial adapter, by holding the vial adapter with one hand and turning the syringe counter-clockwise with your other hand.
- Continue to hold the barrel of the syringe. With your free-hand, twist the 27-gauge needle onto the tip of the syringe until it fits snugly.
- Remove the pink plastic cap from the Enbrel vial.
- Place the Enbrel vial on your flat work surface. Use one alcohol swab to clean the gray stopper on the Enbrel vial.
- Open the wrapper that contains the 25-gauge needle by peeling apart the tabs and set the needle aside for later use. The 25-gauge needle will be used to mix the liquid with the powder and for withdrawing Enbrel from the vial.
- Slide the plunger into the flange end of the syringe.
- Attach the plunger to the gray rubber stopper in the syringe by turning the plunger clockwise until you feel a slight resistance.
- Remove the twist-off cap from the prefilled diluent syringe by turning counter-clockwise.
- Continue to hold the barrel of the syringe. With your free-hand, twist the 25-gauge needle onto the tip of the syringe until it fits snugly. Place the syringe on your flat work surface.
- Open the wrapper that contains the 27-gauge needle by peeling apart the tabs and set the needle aside for later use. The 27-gauge needle will be used to inject the dose.
- Pick up the syringe from your flat work surface. Hold the barrel of the syringe with one hand, and pull the needle cover straight off. To avoid damaging the needle,
- Place the needle cover (open side up) in the round space marked “N” in the Enbrel dose tray.
- Place the Enbrel vial on your flat work surface. Hold the syringe with the needle facing up, and gently pull back on the plunger to pull a small amount of air into the syringe. Then, insert the needle straight down through the
- Push the plunger down very slowly until all liquid from the syringe is in the Enbrel vial. Adding the liquid too fast will cause foaming (bubbles).
- Leave the syringe in place. Gently swirl the Enbrel vial in a circular motion to dissolve the powder.
- With the needle in the Enbrel vial, turn the vial upside down. Hold the syringe at eye level and slowly pull the plunger down to the unit markings on the side of the syringe that correspond with the correct dose. Make sure to keep the tip of the needle in the solution. Some white foam may remain in the Enbrel vial. This is normal.
- With the needle still inserted in the Enbrel vial, check for air bubbles in the syringe. Gently tap the syringe to make any air bubbles rise to the top of the syringe. Slowly push the plunger up to remove the air bubbles. If you push solution back into the vial, slowly pull back on the plunger to draw the correct amount of solution back into the syringe.
- Remove the syringe and needle from the Enbrel vial. Keep the needle attached to the syringe and insert the 25-gauge needle straight down into the needle cover in the Enbrel dose tray.
- Twist the 27-gauge needle onto the syringe until it fits snugly.
- If there is enough solution left in the Enbrel vial for another dose, write the date you mixed the powder and liquid in the area marked “Mixing Date:” on the sticker supplied with these instructions, and attach the sticker to the Enbrel vial. Refrigerate the reconstituted (mixed) Enbrel vial (in the dose tray) after mixing. Prepare additional doses from the Enbrel vial as described in Step 3. Otherwise, throw away (discard) the Enbrel vial and any remaining solution.
- Select a clean, well-lit, flat work surface, such as a table.
- Do not reuse the needles and syringes supplied with Enbrel dose tray. You will need new needles and syringes for each additional dose. Your healthcare provider will tell you what type of syringes (1 mL) and needles (25-gauge and 27-gauge) to use. Place the sterile syringe with a 25-gauge needle (for withdrawing Enbrel), a 27-gauge needle (for injecting Enbrel) and two alcohol swabs on your flat work surface.
- Take the vial of Enbrel solution that is stored in the dose tray out of the refrigerator and place it on your flat work surface.
- Check the mixing date you wrote on the sticker on the Enbrel vial.
- Wash your hands with soap and warm water.
- Use one alcohol swab to clean the gray stopper on the Enbrel vial.
- If the syringe and the 25-gauge needle are not pre-assembled, assemble them as instructed by your healthcare provider.
- Open the wrapper that contains the 27-gauge needle by peeling apart the tabs and set the needle aside for later use. The 27-gauge needle will be used to inject the dose of Enbrel.
- Hold the syringe and pull the needle cover straight off. To avoid damaging the needle,
- Place the Enbrel vial on your flat work surface. Hold the syringe with the needle facing up, and gently pull back the plunger to pull a small amount of air into the syringe. Then, insert the 25-gauge needle straight down through the
- Keep the needle in the Enbrel vial and turn the vial upside down. Hold the syringe at eye level, and slowly pull the plunger down to the unit markings on the syringe that correspond to your child’s dose. As the amount of solution in the Enbrel vial drops, you may need to pull the needle back just enough to keep the tip of the needle in the solution.
- With the needle still inserted in the Enbrel vial, check for air bubbles in the syringe. Gently tap the syringe to make any air bubbles rise to the top of the syringe. Slowly push the plunger up to remove the air bubbles. If you push solution back into the Enbrel vial, slowly pull back on the plunger to again draw the correct amount of solution back into the syringe.
- Remove the syringe and needle from the Enbrel vial. Keep the needle attached to the syringe and insert the 25-gauge needle straight down into the needle cover in the Enbrel dose tray. You should hear a “snap” when the needle is secure in the needle cover. Once the needle is secure in the needle cover, remove the 25-gauge needle from the syringe and dispose of the needle in a sharps disposal container (see
- Attach the 27-gauge needle onto the tip of the syringe until it fits snugly.
- The 3 recommended injection sites for Enbrel include:
- Rotate the site for each injection.
- If you have psoriasis, you should not inject directly into any raised, thick, red, or scaly skin patches or lesions.
- To prepare the area of skin where Enbrel is to be injected, wipe the injection site with a new alcohol swab.
- Pick up the syringe from your flat work surface. Hold the barrel of the syringe with one hand and pull the needle cover straight off. To avoid damaging the needle,
- With one hand, gently pinch the cleaned area of skin and hold it firmly. With the other hand, hold the syringe (like a pencil) at a 45-degree angle to the skin.
- With a quick and "dart-like" motion, insert the needle at a 45-degree angle into the skin.
- When the needle is completely inserted into the skin, let go of the skin that you are holding. With your free-hand, hold the syringe near its base to stabilize it. Then push the plunger to inject all of the Enbrel solution at a slow, steady rate.
- When the syringe is empty, pull the needle out of the skin, being careful to keep it at the same angle as inserted.
- There may be a little bleeding at the injection site. You can press a cotton ball or gauze over the injection site for 10 seconds.
- If your healthcare provider has instructed you to take two Enbrel injections on the same day, repeat the steps to prepare and give an injection of Enbrel. Choose and prepare a new injection site for the second injection.
- For the Free-Hand Method: If there is enough solution left in the Enbrel vial for another dose, refrigerate the reconstituted (mixed) Enbrel vial (in the dose tray) after use. Otherwise, discard the Enbrel vial and any remaining solution.
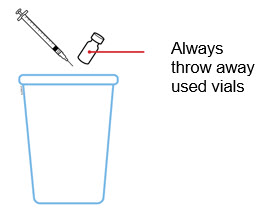
- Put the used syringes, needles, and vials in a FDA-cleared sharps disposal container right away after use.
- If you do not have a FDA-cleared sharps disposal container, you may use a household container that is:
- When your sharps disposal container is almost full, you will need to follow your community guidelines for the right way to dispose of your sharps disposal container. There may be state or local laws about how you should throw away used syringes and needles. For more information about safe sharps disposal, and for specific information about sharps disposal in the state that you live in, go to the FDA’s website at: http://www.fda.gov/safesharpsdisposal
- Do not reuse the syringe or vial.
- Do not recycle the syringe, vial, or sharps disposal container or throw them into household trash.
Immunex Corporation
Thousand Oaks, CA 91320-1799
U.S. License Number 1132
 This printed material is recyclable.
- Contact your healthcare provider,
- Visit
- Call 1-888-4ENBREL (1-888-436-2735).
- Wait 30 minutes for the cartridge to reach room temperature.
- Remove 1 cartridge from the carton in the refrigerator.
- Put the carton containing any unused cartridges back in the refrigerator.
- Let the cartridge warm up naturally.
- Do not heat the cartridge with hot water, a microwave, or direct sunlight.
- Do not put the cartridge back in the refrigerator once it reaches room temperature.
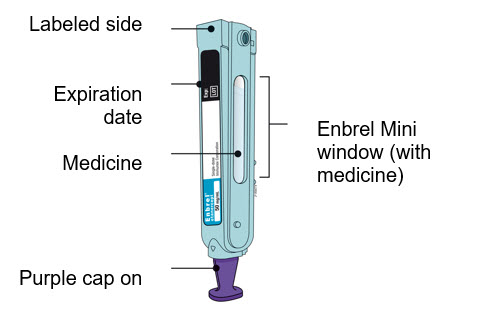
- Inspect the medicine. It should be clear and colorless.
- It is okay to see air bubbles.
- Do not use the cartridge if the medicine is cloudy, discolored, or contains large lumps, flakes, or colored particles.
- It is okay to see small white particles in the medicine.
- Check the expiration date (Exp.) and inspect the cartridge for damage.
- Do not use the cartridge if the expiration date has passed.
- Do not use the cartridge if:
- the purple needle cap is missing or loose,
- it has cracks or broken parts, or
- it has been dropped on a hard surface.
- Gather and place the following items for the injection on a clean, flat, and well-lit surface:
- AutoTouch reusable autoinjector,
- 1 Enbrel Mini cartridge (room temperature),
- Sharps disposal container [see
- 3 Alcohol wipes,
- Adhesive bandage, and
- Cotton balls or gauze pads.

- Wash your hands thoroughly with soap and water.
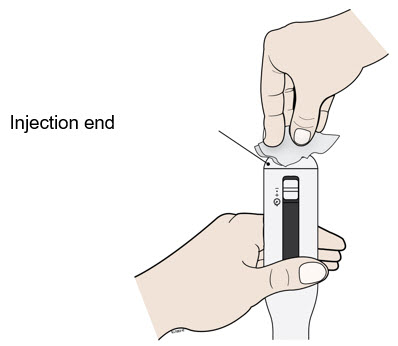
- Clean the injection end of the autoinjector with an alcohol wipe.
- Let the injection end dry on its own.
- Do not touch this area again before injecting.
- Do not use the autoinjector if:
- the expiration date has passed,
- it has cracks or broken parts, or
- it has been dropped on a hard surface.
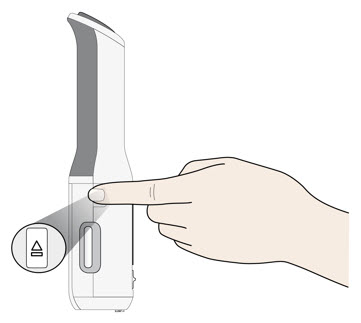
- Press the door button to open the autoinjector door.
- Do not block the door while pushing the door button.
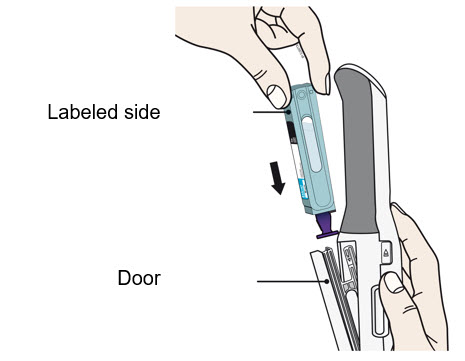
- Insert the cartridge with the purple needle cap down and the labeled side facing out.
- The cartridge will slide all the way down into the autoinjector.
- Do not force the cartridge into the autoinjector door.
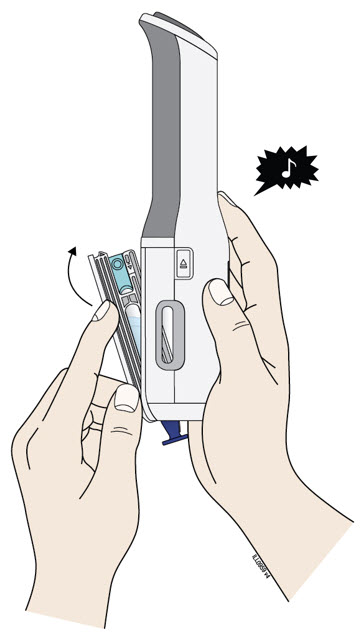
- Once the cartridge is inserted, push the door to close it.
- Do not remove the purple needle cap until step 11.
- Select 1 of these injection site locations.
- You can inject into the:
- Another person may give you the injection in the back of your upper arm.
- Choose a different site for each injection.
- Clean the injection site with a new alcohol wipe.
- Let the skin dry on its own.
- Do not touch this area again before injecting.

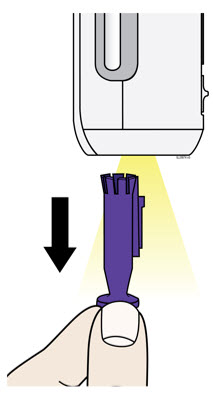
- Pull the purple needle cap straight down to remove.
- Do not twist or bend the purple needle cap to pull it off.
- Never put the purple needle cap back on. It may damage the needle.
- It is normal to see a drop of medicine come out of the needle or injection end of the autoinjector.
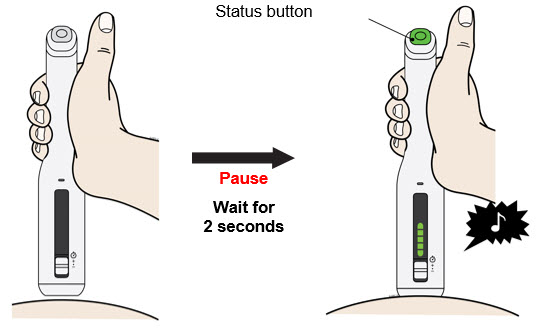
- With the progress bar facing you, place and hold the autoinjector on the injection site.
- After placing on the skin, wait for the:
- Do not stretch or pinch the injection site.

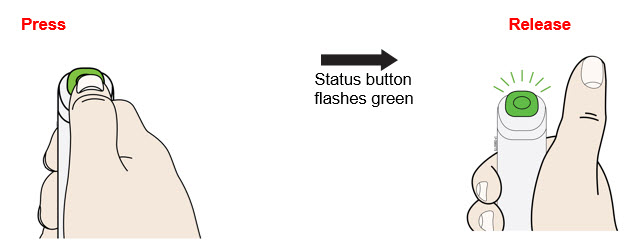
- Press and release the status button to inject.
- Do not lift the autoinjector from the skin until the injection is complete.
- During the injection:
- The injection may take up to 20 seconds to complete.

- Keep holding flat on the skin until the status button and progress bar turn off.
- The injection is complete when the:
- Lift it from the skin when the injection is complete.
- Do not block the door, it will open automatically.
- Remove the used cartridge and confirm a full dose of medicine was injected.
- When the door opens, remove the used cartridge and close the door.
- A small drop of liquid on the injection site is okay.
- Place the used cartridge and purple needle cap in an FDA-cleared sharps disposal container.
- Do not reuse the cartridge.
- Do not throw away the cartridge in your household trash.
- Small parts such as the purple needle cap may cause a choking hazard for children and pets.
- Check the injection site.
- Do not rub the injection site.
- If there is blood, press a cotton ball or gauze pad on the injection site.
- Apply an adhesive bandage if necessary.
- Clean the injection end of the autoinjector with a new alcohol wipe and let it dry.
- Store the autoinjector at room temperature in a dry, safe place such as in a cabinet or drawer.
- Do not store the autoinjector in the refrigerator.
- made of a heavy-duty plastic,
- can be closed with a tight-fitting, puncture-resistant lid, without sharps being able to come out,
- upright and stable during use,
- leak-resistant, and
- properly labeled to warn of hazardous waste inside the container.
- It is important that you do not try to give the injection until you have fully read and understood this Instructions for Use.
- Children must weigh at least 138 pounds to receive 50 mg Enbrel Mini. Children who weigh less than 138 pounds should receive a different form of ENBREL.
- Do not use the autoinjector or cartridges if either carton is damaged or either seal is broken.
- The autoinjector and the cartridge are not made with natural rubber latex.
- Do not use the autoinjector or cartridge if it has been dropped on a hard surface. Part of the autoinjector or cartridge may be broken even if you cannot see the break.
- If the cartridge has been dropped, use a new cartridge and call 1-888-4ENBREL (1-888-436-2735).
- If the autoinjector has been dropped, call for a replacement at 1-888-4ENBREL (1-888-436-2735).
- Store the autoinjector at room temperature in a dry, safe place, such as a cabinet or drawer at 50°F to 104°F (10°C to 40°C).
- Do not store the autoinjector in the refrigerator with the cartridge.
- Use an alcohol wipe to clean the bottom (injection end) before and after each use.
- Keep the cartridge which contains ENBREL, in the refrigerator between 36°F to 46°F (2°C to 8°C).
- If needed, you may store the cartridge at room temperature between 68°F to 77°F (20°C to 25°C) for up to 30 days.
- Do not put the cartridge back in the refrigerator once it reaches room temperature.
- Record the date you removed the cartridge from the refrigerator and use it within 30 days.
- Do not store the cartridge in extreme heat or cold. For example, avoid storing in your vehicle's glove box or trunk.
- Do not freeze the cartridge.
- Do not shake the cartridge at any time.
- Keep the cartridge in the original carton to protect it from light or physical damage.
- Do not remove the purple needle cap from the cartridge until it is inside the autoinjector and you have reached step 11 in this Instructions for Use.

- the expiration date has passed
- the green cap is not attached
- it has lumps, is discolored, or is cloudy.
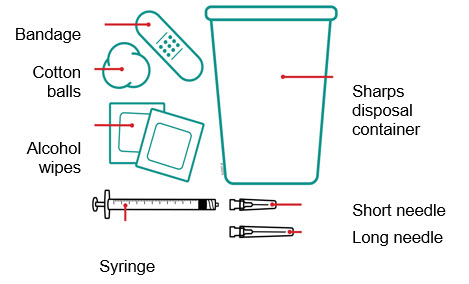
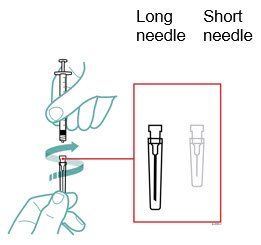
- 1 mL syringe
- Long needle: for withdrawal
- Short needle: for injection
- Alcohol wipes
- Cotton balls
- Bandage
- Sharps disposal container
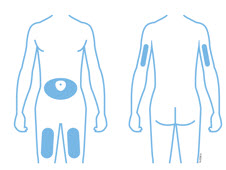
- thigh or stomach (avoid 2 inches around the navel)
- back of upper arm (only if someone else is giving the injection)
- made of a heavy-duty plastic
- can be closed with a tight-fitting, puncture-resistant lid without sharps being able to come out
- upright and stable during use
- leak-resistant
- properly labeled to warn of hazardous waste inside the container
- Do not throw away your used sharps disposal container in your household trash unless your community guidelines permit this. Do not recycle your used sharps disposal container.
- Do not reuse the vials, syringe, or needles.
- Do not recycle the vials, syringe, needles, or sharps disposal container or throw them into household trash.
Immunex Corporation
Thousand Oaks, CA 91320-1799
U.S. License Number 1132
© 1998-2020, 2022, 2024 Immunex Corporation. All rights reserved.
[part number]
Revised: 10/2024 v3
 This printed material is recyclable.